Our Milpitas Fence Contractor Ideas
Wiki Article
The Buzz on Milpitas Fence And Deck
Table of ContentsSome Of Deck Builder Milpitas6 Simple Techniques For Deck Builder MilpitasMilpitas Fence Contractor Can Be Fun For EveryoneThe Single Strategy To Use For Pergola Intallation MilpitasMilpitas Fence Contractor - QuestionsThe Greatest Guide To Pergola Intallation Milpitas
To surprise your deck boards, lay the initial complete deck board down, after that lay the next one down, seeing to it it butts up against the full board. Cut this item to fit, after that take the other fifty percent of the board you didn't use and also begin your 2nd row of outdoor decking with it besides the first full item.Both ends of your deck boards will certainly end on a joist. 5" of deck board width past the joists.
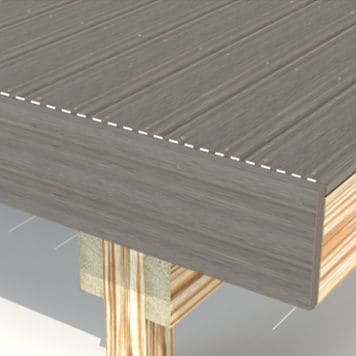
In time the lumber will dry out, producing a space between the deck boards. Whichever way you pick to area your deck boards, see to it you make use of the same spacers for the entire installment. A regular deck board spacing is perhaps one of the most crucial visuals on a deck - pergola intallation milpitas. Making use of a gadget like the CAMO Marksman Pro makes spacing deck boards straightforward, and also you can screw your deck board in while you room the board, making your deck board installation much faster.
The Only Guide for Pergola Intallation Milpitas
Pro Suggestion: Obtain a new blade for your miter saw. This will reduce the quantity of cut-out on your deck board ends, making the butt joints look smoother as well as much less obvious. A decent blade will certainly last your entire deck project and also beyond, so it's a tiny rate to spend for a nice-looking deck./terrace-deck-construction---man-installing-wpc-composite-decking-boards-1221950510-c202032e84ab4fb3b32aef49d8dc4490.jpg)
See to it your next deck board is still" from your home, as well as screw it in. Your deck board butt finishes need to be fixated the joist to enable sufficient area for the four screws it will hold 2 from each butt end - wood fence installation milpitas. Take the deck board item you didn't make use of from your previous cut and also utilize it as the very first deck board for your next row.
You intend to ensure that this piece ends one joist before the joist where your very first deck board terminated. Prior to you attach the board, guarantee it is" from the initial row of deck boards. Use deck board spacers or the Camouflage Marksman Pro system to make sure even spacing.
Top Guidelines Of Milpitas Fence And Deck
Use the very same procedure of reducing the deck boards, then using their cut ends to form your following row, ensuring butt ends are one joist away from the end of the previous row. This will certainly give you an arbitrary deck board spacing layout that will look wonderful, visually. Remember to constantly make use of two screws per joist, and to overlap your deck boards at least 1.
Utilize a jigsaw to cut the last little bit on either end, as the residence won't permit your round saw to cut the last number of inches. You might need to cut the size of your final deck board. If the width of our last deck board is even more than 1.
The Main Principles Of Milpitas Fence Contractor
Simply as you did with the deck board finishes, action 1. 5" beyond the edge joist on completion of your last deck board. Make a mark. Do the same on the various other end of the very same deck board. Utilize a chalk line, make your line, and also reduced with the circular saw.If so, after that you'll initially require to gauge precisely where they go. When you have actually done that, determine as well as use look these up a pencil to redirected here represent on the deck boards where the railing articles are. Utilize a drill with a small spade little bit, such as ", and make a hole inside the mark that shows where the barrier message will go.
Make certain you provide" or 3/16" on all sides of the deck barrier blog post to permit for simplicity of installment as well as changing in instance your barrier articles happen to change slightly with time. This will certainly stop the deck boards from cracking. Final thought There are few things extra satisfying than installing brand-new deck boards.
Getting My Pergola Intallation Milpitas To Work

To obtain the best ended up look start mounting decking boards or composite product from the outdoors side of the deck (milpitas fence and deck). In this manner you can make up the" fascia board and a 1" overhang along with the scratching around the barrier messages. Utilize a moving bevel to determine the angle of the railing messages against the deck boards.
This means the installed deck boards should have at the very least 1. 75 to 2. 75" overhang prior to the fascia is installed. Making Certain Decking is Identical Begin by installing the first deck board on the front outdoors side of the deck framework. Make certain an equivalent overhang along the size of the board as well as nail or screw it in area.
The Ultimate Guide To Milpitas Fence And Deck
Many boards have a mild curve to them see this site so tear the boards in line and also parallel by utilizing a carve into among the joists as well as levering the board more detailed to the other. Or utilize this deck bar tool to align it up in a breeze. It will conserve you dulling up your sculpt as well as it's developed flawlessly to do this job.An excellent long lasting filler is vehicle body filler. It is normally white in shade, unless you can tint it. It is really difficult and also the least likely to pop out gradually. It likewise sands quite possibly. It would be a good option if you are intending on staining with a strong shade.
Report this wiki page